본문 바로가기

개발일지/React

[노마드 코더] ReactJS 트위터 클론 코딩 - Tweeting

반응형

이 포스팅은 노마드 코더님의 트위터 클론코딩을 학습 후 작성하였습니다. (무료!!)

https://nomadcoders.co/nwitter


트위터 클론코딩 – 노마드 코더 Nomad Coders

React Firebase for Beginners

nomadcoders.co


Navigation Bar 

 이제 기본적인 골격은 완성되었으니 본격적으로 내용물을 채워볼 것이다. 기본적인 UI를 구성하기 위해 내비게이션 바와 트윗을 작성할 텍스트 상자를 만들 것이다.

 먼저 layout.tsx를 열어서 기본적인 골격을 잡아준다.

import { Outlet } from "react-router-dom";
import styled from "styled-components";

const Wrapper = styled.div``;

const Menu = styled.div``;

const MenuItem = styled.div``;

export default function Layout() {
    return (
        <Wrapper>
            <Menu>
                <MenuItem>
               
                </MenuItem>
                <MenuItem>
               
                </MenuItem>
                <MenuItem>
               
                </MenuItem>
            </Menu>
            <Outlet />
        </Wrapper>
    )
}

 구성은 Wrapper 안에 Menu가 있고 3개의 Item이 들어있다. 각각 Home, Profiel, Logout으로 구현될 예정이다. MenuItem안에 원하는 모양의 이미지를 넣어보자. 강의에서는 https://heroicons.com에서 아이콘을 복사해 올 수 있다.

Home svg

<svg data-slot="icon" fill="currentColor" viewBox="0 0 20 20" xmlns="http://www.w3.org/2000/svg" aria-hidden="true">
    <path clip-rule="evenodd" fill-rule="evenodd" d="M9.293 2.293a1 1 0 0 1 1.414 0l7 7A1 1 0 0 1 17 11h-1v6a1 1 0 0 1-1 1h-2a1 1 0 0 1-1-1v-3a1 1 0 0 0-1-1H9a1 1 0 0 0-1 1v3a1 1 0 0 1-1 1H5a1 1 0 0 1-1-1v-6H3a1 1 0 0 1-.707-1.707l7-7Z"></path>
</svg>

Profile svg

<svg data-slot="icon" fill="none" stroke-width="1.5" stroke="currentColor" viewBox="0 0 24 24" xmlns="http://www.w3.org/2000/svg" aria-hidden="true">
	<path stroke-linecap="round" stroke-linejoin="round" d="M15.75 6a3.75 3.75 0 1 1-7.5 0 3.75 3.75 0 0 1 7.5 0ZM4.501 20.118a7.5 7.5 0 0 1 14.998 0A17.933 17.933 0 0 1 12 21.75c-2.676 0-5.216-.584-7.499-1.632Z"></path>
</svg>

Log out svg

<svg data-slot="icon" fill="currentColor" viewBox="0 0 20 20" xmlns="http://www.w3.org/2000/svg" aria-hidden="true">
    <path clip-rule="evenodd" fill-rule="evenodd" d="M3 4.25A2.25 2.25 0 0 1 5.25 2h5.5A2.25 2.25 0 0 1 13 4.25v2a.75.75 0 0 1-1.5 0v-2a.75.75 0 0 0-.75-.75h-5.5a.75.75 0 0 0-.75.75v11.5c0 .414.336.75.75.75h5.5a.75.75 0 0 0 .75-.75v-2a.75.75 0 0 1 1.5 0v2A2.25 2.25 0 0 1 10.75 18h-5.5A2.25 2.25 0 0 1 3 15.75V4.25Z"></path>
    <path clip-rule="evenodd" fill-rule="evenodd" d="M19 10a.75.75 0 0 0-.75-.75H8.704l1.048-.943a.75.75 0 1 0-1.004-1.114l-2.5 2.25a.75.75 0 0 0 0 1.114l2.5 2.25a.75.75 0 1 0 1.004-1.114l-1.048-.943h9.546A.75.75 0 0 0 19 10Z"></path>
</svg>

각 item들을 MenuItem안에 넣어주고 MenuItem은 Link로 감싸서 연결될 페이지를 설정해 준다.

<Wrapper>
    <Menu>
        <Link to="/">
            <MenuItem>
                <svg data-slot="icon" fill="currentColor" viewBox="0 0 20 20" xmlns="http://www.w3.org/2000/svg" aria-hidden="true">
                    <path clip-rule="evenodd" fill-rule="evenodd" d="M9.293 2.293a1 1 0 0 1 1.414 0l7 7A1 1 0 0 1 17 11h-1v6a1 1 0 0 1-1 1h-2a1 1 0 0 1-1-1v-3a1 1 0 0 0-1-1H9a1 1 0 0 0-1 1v3a1 1 0 0 1-1 1H5a1 1 0 0 1-1-1v-6H3a1 1 0 0 1-.707-1.707l7-7Z"></path>
                </svg>
            </MenuItem>
        </Link>
        <Link to="profile">
            <MenuItem>
                <svg data-slot="icon" fill="none" stroke-width="1.5" stroke="currentColor" viewBox="0 0 24 24" xmlns="http://www.w3.org/2000/svg" aria-hidden="true">
                    <path stroke-linecap="round" stroke-linejoin="round" d="M15.75 6a3.75 3.75 0 1 1-7.5 0 3.75 3.75 0 0 1 7.5 0ZM4.501 20.118a7.5 7.5 0 0 1 14.998 0A17.933 17.933 0 0 1 12 21.75c-2.676 0-5.216-.584-7.499-1.632Z"></path>
                </svg>
            </MenuItem>
        </Link>
        <MenuItem>
            <svg data-slot="icon" fill="currentColor" viewBox="0 0 20 20" xmlns="http://www.w3.org/2000/svg" aria-hidden="true">
                <path clip-rule="evenodd" fill-rule="evenodd" d="M3 4.25A2.25 2.25 0 0 1 5.25 2h5.5A2.25 2.25 0 0 1 13 4.25v2a.75.75 0 0 1-1.5 0v-2a.75.75 0 0 0-.75-.75h-5.5a.75.75 0 0 0-.75.75v11.5c0 .414.336.75.75.75h5.5a.75.75 0 0 0 .75-.75v-2a.75.75 0 0 1 1.5 0v2A2.25 2.25 0 0 1 10.75 18h-5.5A2.25 2.25 0 0 1 3 15.75V4.25Z"></path>
                <path clip-rule="evenodd" fill-rule="evenodd" d="M19 10a.75.75 0 0 0-.75-.75H8.704l1.048-.943a.75.75 0 1 0-1.004-1.114l-2.5 2.25a.75.75 0 0 0 0 1.114l2.5 2.25a.75.75 0 1 0 1.004-1.114l-1.048-.943h9.546A.75.75 0 0 0 19 10Z"></path>
            </svg>
        </MenuItem>
    </Menu>
    <Outlet />
</Wrapper>

 Home과 Profile은 Link로 감싸주고 Logout은 필요 없기 때문에 따로 작업하진 않는다. 그러면 다음과 같이 화면에 나타날 것이다. 

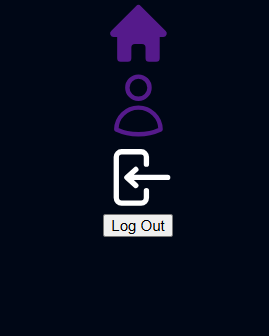
링크가 된 두 이미지를 클릭하면 주소의 이동도 이루어진다. 이제 css를 추가해 준다.

const Wrapper = styled.div`
    display: grid;
    gap : 50px;
    grid-template-columns: 1fr 4fr;
    height: 100%;
    padding : 50px 0px;
    width: 100%;
    max-width: 860px;
`;

const Menu = styled.div`
    display: flex;
    flex-direction: column;
    align-items: center;
    gap: 20px;
`;

const MenuItem = styled.div`
    cursor: pointer;
    display: flex;
    align-items: center;
    justify-content: center;
    border: 2px solid white;
    height: 50px;
    width: 50px;
    border-radius: 50%;
    svg {
        width: 30px;
        fill: white;
    }
    &.log-out {
        border-color: #11487e;
        svg{
            fill: dodgerblue;
        }
    }
`;

css 부분을 추가해 주면 다음과 같은 모양이 된다.

 이제 Logout 설정을 해주자. onClick event를 이용해서 onLogOut함수를 할당해 주고 onLogOut함수를 작성해 본다.

<MenuItem onClick={onLogOut} className="log-out">
const navigate = useNavigate();
const onLogOut = async() => {
    const ok = confirm("로그아웃을 원하십니까?");
    if(ok) {
        await auth.signOut();
        navigate("/login");
    }
}

 onLogOut 함수를 만들고 async() 설정을 해준다. 함수 안에는 confirm문을 이용하여 로그아웃 여부를 확인한 후 확인이 완료되면 firebase의 auth.signOut();을 이용하여 로그아웃 시켜준다. 그리고 navigate를 이용하여 login page로 redirect 시켜주면 된다. 그리고 기존에 만들었던 Home.js의 Log out

버튼도 삭제해 주자.


Post Tweet From

 이번에는 트윗을 올리는 컴포넌트를 만들어보자. components폴더에 post-tweet-form.tsx를 생성하자. 

import styled from "styled-components"

const Form = styled.form``;

const TextArea = styled.textarea``;

const AttachFileButton = styled.label``;

const AttachFileInput = styled.input``;

const SubmitBtn = styled.input``;

export default function PostTweetFrorm() {
    return <Form>
        <TextArea />
        <AttachFileButton>Add photo</AttachFileButton>
        <AttachFileInput />
        <SubmitBtn />
    </Form>
}

 기본 골격부터 잡아본다. Form tag 안에 글을 쓸 수 있는 textarea가 있고 파일을 추가할 수 있는 button과 게시글 제출버튼을 만들어 준다.

<Form>
    <TextArea placeholder="What is happening?"/>
    <AttachFileButton htmlFor="file">Add photo</AttachFileButton>
    <AttachFileInput type="file" id="file" accept="image/*" />
    <SubmitBtn type="submit" value="Post Tweet"/>
</Form>

 TextArea에 placeholder를 넣어주고 AttachFileInput에 type을 file로 설정해 주고 id와 허용값을 넣어준다. AttachFileButton에는 file id를 연결시켜 주고 Home component에 PostTweetFrom을 넣어준다.

import styled from "styled-components";
import PostTweetFrorm from "../components/post-tweet-form";

const Wrapper = styled.div``;

export default function Home() {
    return (
        <Wrapper>
            <PostTweetFrorm />
        </Wrapper>
    );
}

그리고 홈으로 가보면 아래처럼 보인다.

파일 선택 버튼은 css로 꾸며주기가 어렵기 때문에 숨겨주고, label로 연결해 둔 <AttachFileButton>을 꾸며준다.

const Form = styled.form`
    display: flex;
    flex-direction: column;
    gap: 10px;
`;

const TextArea = styled.textarea`
    border: 2px solid white;
    padding: 20px;
    border-radius: 20px;
    font-size: 16px;
    color: white;
    background-color: black;
    width: 100%;
    resize: none;
    font-family: system-ui, -apple-system, BlinkMacSystemFont, 'Segoe UI', Roboto, Oxygen, Ubuntu, Cantarell, 'Open Sans', 'Helvetica Neue', sans-serif;
    &::placeholder {
        font-size: 16px;
    }
    &:focus {
        outline: none;
        border-color: #1d9bf0;
    }
`;

const AttachFileButton = styled.label`
    padding: 10px 0px;
    color: #1d9bf0;
    text-align: center;
    border-radius: 20px;
    border: 1px solid #1d9bf0;
    font-size: 14px;
    font-weight: 600;
    cursor: pointer;
`;

const AttachFileInput = styled.input`
    display: none;
`;

const SubmitBtn = styled.input`
    background-color: #1d9bf0;
    color: white;
    border: none;
    padding: 10px 0px;
    border-radius: 20px;
    font-size: 16px;
    cursor: pointer;
    &:hover,
    &:active {
        opacity: 0.8;
    }
`;

css를 꾸며주면 아래처럼 바뀐다.

export default function PostTweetFrorm() {
    const [isLoading, setLoading] = useState(false);
    const [tweet, setTweet] = useState("");
    const [file, setFile] = useState<File|null>(null);
    const onChange = (e:React.ChangeEvent<HTMLTextAreaElement>) => {
        setTweet(e.target.value);
    }
    const onFileChange = (e: React.ChangeEvent<HTMLInputElement>) => {
        const {files} = e.target;
        if(files && files.length === 1) {
            setFile(files[0]);
        }
    }
    return (
    <Form>
        <TextArea rows={5} maxLength={180} onChange={onChange} value={tweet} placeholder="What is happening?"/>
        <AttachFileButton htmlFor="file">{file ? "Photo added✔" : "Add photo"}</AttachFileButton>
        <AttachFileInput onChange={onFileChange} type="file" id="file" accept="image/*" />
        <SubmitBtn type="submit" value={isLoading ? "Posting..." : "Post Tweet"}/>
    </Form>
    )
}

 이제 PostTwetFrom() 안에 isLoading, tweet, file을 useState로 선언해 주고, onChange함수와 onFileChange함수를 만들어 준다. 

 onChange 함수는 입력값을 감지하여 tweet에 값을 넣어준다. onFileChange 함수는 동록 한 file의 길이가 1이면 파일배열의 첫 번째 파일을 file의 값으로 넣어준다. TextArea와 AttachFileInput에 onChange evnet를 등록해 주고 나머지 Loding시에 변경될 문구들도 넣어준다.

git : https://github.com/leesulgi66/nwitter-reloaded/commit/83ac67616abc3f2716d5267ffbbb59f7b0319a7b


 먼저 firebase의 Cloud Firestore를 활성해 주 어야 한다. Cloud Firestore는 NoSQL 데이터베이스이다.

완료되면 위의 화면처럼 Firestore Database가 활성화된다.

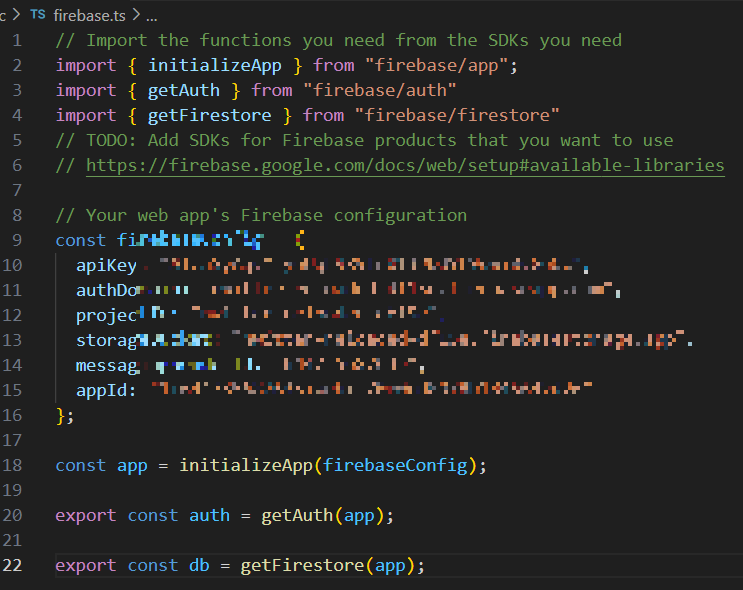
 이제 firebase.ts로 가서 데이터베이스의 권한을 얻어야 한다. firebase/firestore의 getFirestore를 import 해주고 권한을 획득한다.

import { getFirestore } from "firebase/firestore"

export const db = getFirestore(app);


이제 데이터를 추가해 보자. post-tweet-form.tsx에서 onSubmit() 코드를 추가한다.

const onSubmit = async(e:React.FormEvent<HTMLFormElement>) => {
    e.preventDefault();
    const user = auth.currentUser
    if(!user || isLoading || tweet === "" || tweet.length > 180) return;
    try{
        setLoading(true);
        await addDoc(collection(db, "tweets"), {
            tweet,
            createdAt: Date.now(),
            username: user.displayName || "Anonymous",
            userId: user.uid,
        })
    }catch(e) {
            console.log(e);
    }finally {
        setLoading(false);
    }
}

 현재 user를 확인하기 위해 user변수에 auth.currentUser를 넣어준다. 그리고 user가 없거나, 로딩 중이거나, 트윗이 빈값이거나, 180자가 넘어가면 포스팅을 종료시켜 준다.

try/catch 구문을 이용하여 try구문에 로딩 상태를 변경해 주고 addDoc함수를 import 해준다. 함수는 두 개의 인자가 필요한데, collection()과 입력할 data가 필요하다. collection() 또한 두 개의 인자가 필요하며 firestore와 주소값 string 즉 collection의 name이 들어간다. 

 firestore의 경우 바로 위에서 설정한 export const db = getFirestore(app); 값이며, import후 불러올 수 있다. 그리고 collection의 이름인 "tweets"를 써준다. 

 입력 data로는 트윗내용, 작성시간, 작성자 이름, 작성자의 id값 네 가지로 입력해 준다. 추후 작성자의 id값을 확인하여 삭제 또는 수정을 구현할 수 있을 것이다.

 catch구문에는 발생될 error를 console로 출력해 주고 finally구문에 로딩의 끝을 알려준다. 이제 함수를 <From> 안에 넣어준다.

<Form onSubmit={onSubmit}>

그리고 트윗을 작성해 보면

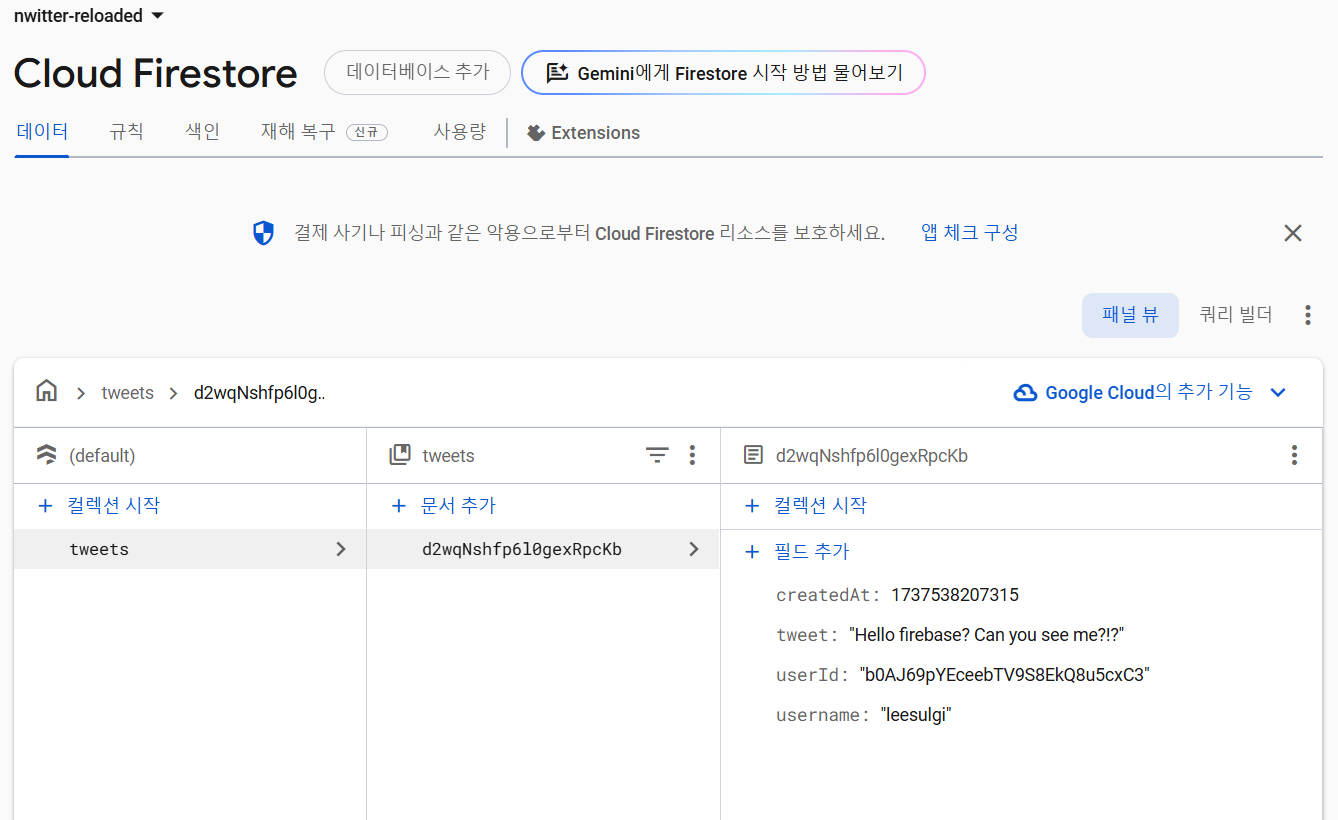
데이터 베이스에 입력한 값들이 잘 들어오는 것을 볼 수 있다.

post-tweet-form.tsx

import { addDoc, collection } from "firebase/firestore";
import React, { useState } from "react";
import styled from "styled-components"
import { auth, db } from "../firebase";

const Form = styled.form`
    display: flex;
    flex-direction: column;
    gap: 10px;
`;

const TextArea = styled.textarea`
    border: 2px solid white;
    padding: 20px;
    border-radius: 20px;
    font-size: 16px;
    color: white;
    background-color: black;
    width: 100%;
    resize: none;
    font-family: system-ui, -apple-system, BlinkMacSystemFont, 'Segoe UI', Roboto, Oxygen, Ubuntu, Cantarell, 'Open Sans', 'Helvetica Neue', sans-serif;
    &::placeholder {
        font-size: 16px;
    }
    &:focus {
        outline: none;
        border-color: #1d9bf0;
    }
`;

const AttachFileButton = styled.label`
    padding: 10px 0px;
    color: #1d9bf0;
    text-align: center;
    border-radius: 20px;
    border: 1px solid #1d9bf0;
    font-size: 14px;
    font-weight: 600;
    cursor: pointer;
`;

const AttachFileInput = styled.input`
    display: none;
`;

const SubmitBtn = styled.input`
    background-color: #1d9bf0;
    color: white;
    border: none;
    padding: 10px 0px;
    border-radius: 20px;
    font-size: 16px;
    cursor: pointer;
    &:hover,
    &:active {
        opacity: 0.8;
    }
`;

export default function PostTweetFrorm() {
    const [isLoading, setLoading] = useState(false);
    const [tweet, setTweet] = useState("");
    const [file, setFile] = useState<File|null>(null);
    const onChange = (e:React.ChangeEvent<HTMLTextAreaElement>) => {
        setTweet(e.target.value);
    }
    const onFileChange = (e: React.ChangeEvent<HTMLInputElement>) => {
        const {files} = e.target;
        if(files && files.length === 1) {
            setFile(files[0]);
        }
    }
    const onSubmit = async(e:React.FormEvent<HTMLFormElement>) => {
        e.preventDefault();
        const user = auth.currentUser
        if(!user || isLoading || tweet === "" || tweet.length > 180) return;
        try{
            setLoading(true);
            await addDoc(collection(db, "tweets"), {
                tweet,
                createdAt: Date.now(),
                username: user.displayName || "Anonymous",
                userId: user.uid,
            })
        }catch(e) {
            console.log(e);
        }finally {
            setLoading(false);
        }
    }
    return (
    <Form onSubmit={onSubmit}>
        <TextArea rows={5} maxLength={180} onChange={onChange} value={tweet} placeholder="What is happening?"/>
        <AttachFileButton htmlFor="file">{file ? "Photo added✔" : "Add photo"}</AttachFileButton>
        <AttachFileInput onChange={onFileChange} type="file" id="file" accept="image/*" />
        <SubmitBtn type="submit" value={isLoading ? "Posting..." : "Post Tweet"}/>
    </Form>
    )
}


이전 글 :

[노마드 코더] ReactJS 트위터 클론 코딩 - Router
[노마드 코더] ReactJS 트위터 클론 코딩 - Authentication
[노마드 코더] ReactJS 트위터 클론 코딩 - Github Login


다음 글 :

[노마드 코더] ReactJS 트위터 클론 코딩 - Uploading Images with S3
[노마드 코더] ReactJS 트위터 클론 코딩 - Fetching Timeline

[노마드 코더] ReactJS 트위터 클론 코딩 - Realtime Tweets & Delete

[노마드 코더] ReactJS 트위터 클론 코딩 - Edit tweet(code challenge)

[노마드 코더] ReactJS 트위터 클론 코딩 - Pfofile page

반응형