이 포스팅은 노마드 코더님의 트위터 클론코딩을 학습 후 작성하였습니다. (무료!!)
https://nomadcoders.co/nwitter
트위터 클론코딩 – 노마드 코더 Nomad Coders
React Firebase for Beginners
nomadcoders.co
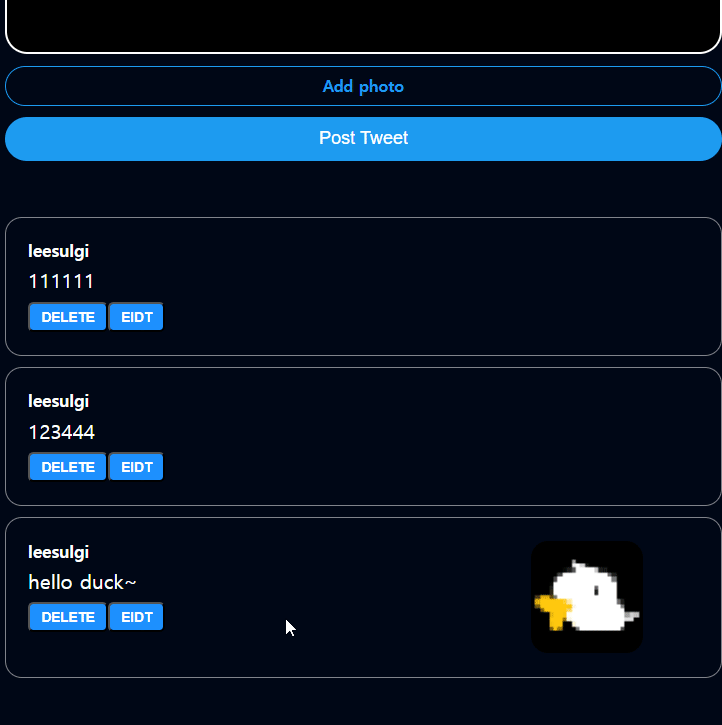
이번에는 코드 챌린지로 이미 작성된 트윗을 수정해 보는 걸 도전해 보자. 이미 쓰인 트윗이 있기 때문에 변경할 트윗을 선택한 후에 변경된 내용을 수정하는 방식으로 구성해 볼 생각이다.
먼저 delete와 같은 버튼을 하나 복사해 준다.
return ( < Wrapper >
< Column >
< Username > { username } </ Username >
< Payload > { tweet } </ Payload >
{ user ?. uid === userId ? < DeleteButton onClick = { onDelete } > Delete </ DeleteButton > : null }
{ user ?. uid === userId ? < DeleteButton onClick = { onEdit } > Edit </ DeleteButton > : null }
</ Column >
{ photo === "" ? null : < Column >
< Photo src = { photo } />
</ Column > }
</ Wrapper >
)
onClick 함수를 onEdit으로 변경해 주고 onEdit() 함수를 만들어 준다. 또한 update에 필요한 state도 생성해 주자.
const [ isLoading , setLoading ] = useState ( false );
const [ isEdit , setEdit ] = useState ( false );
const [ changeTweet , setChangeTweet ] = useState (tweet );
const [ file , setFile ] = useState < File | null >( null );
일단 이미 쓰여 있는 tweet이 있기 때문에 edit버튼을 눌렀을 때 해당 내용을 담고 있는 text box가 불러져 와야 할 것이다. changeTweet의 기본값으로 받아온 tweet을 넣어 준다. <Payload> 부분을 삼항 연산자로 edit이 실행되면 textArea로 변경해 준다. post-tweet-form.tsx에서 textArea를 가져오고 조금 더 작게 수정해 준다.
const TextArea = styled . textarea `
border : 2px solid white ;
padding : 20px ;
border-radius : 20px ;
font-size : 16px ;
color : white ;
background-color : black ;
width : 100% ;
resize : none ;
font-family : system-ui , -apple-system, BlinkMacSystemFont, 'Segoe UI' , Roboto, Oxygen, Ubuntu, Cantarell, 'Open Sans' , 'Helvetica Neue' , sans-serif ;
& ::placeholder {
font-size : 16px ;
}
& :focus {
outline : none ;
border-color : #1d9bf0 ;
}
` ;
return ( < Wrapper >
< Column >
< Username > { username } </ Username >
< TextArea required rows = { 2 } maxLength = { 180 } value = { changeTweet } />
< Payload > { tweet } </ Payload >
{ user ?. uid === userId ? < DeleteButton onClick = { onDelete } > Delete </ DeleteButton > : null }
{ user ?. uid === userId ? < DeleteButton onClick = { onEdit } > Edit </ DeleteButton > : null }
</ Column >
{ photo === "" ? null : < Column >
< Photo src = { photo } />
</ Column > }
</ Wrapper >
)
이제 삼항연산자를 이용해 edit 중일 때만 textArea가 나오게 변경하고, 내용의 값이 바뀔 수 있도록 onChange 함수도 만들어 준다.
const onChange = ( e : React . ChangeEvent < HTMLTextAreaElement >) => {
setChangeTweet ( e . target . value );
}
return ( < Wrapper >
< Column >
< Username > { username } </ Username >
{ isEdit ? < TextArea required rows = { 2 } maxLength = { 180 } value = { changeTweet } onChange = { onChange } /> :
< Payload > { tweet } </ Payload > }
{ user ?. uid === userId ? < DeleteButton onClick = { onDelete } > Delete </ DeleteButton > : null }
{ user ?. uid === userId ? < DeleteButton onClick = { onEdit } > Edit </ DeleteButton > : null }
</ Column >
{ photo === "" ? null : < Column >
< Photo src = { photo } />
</ Column > }
</ Wrapper >
onEdit 함수에서 edit을 스위치 형식으로 바꾸어 주면 상태 전환이 가능해진다.
const onEdit = () => {
if ( user ?. uid !== userId ) return ;
setEdit ( ! isEdit );
}
isEdit(true) 상태일 때 추가적인 버튼과 문구를 바꾸어 주자. edit 문구는 cancel로 취소할 수 있게 만들어 주고 submit을 보낼 버튼과 image 또한 수정할 수 있도록 버튼을 만들어 주자.
return ( < Wrapper >
< Column >
< Username > { username } </ Username >
{ isEdit ? < TextArea required rows = { 2 } maxLength = { 180 } value = { changeTweet } onChange = { onChange } /> :
< Payload > { tweet } </ Payload > }
{ user ?. uid === userId ? < DeleteButton onClick = { onDelete } > Delete </ DeleteButton > : null }
{ user ?. uid === userId ? isEdit ? < DeleteButton onClick = { onEdit } > cancel </ DeleteButton > : < DeleteButton onClick = { onEdit } > Eidt </ DeleteButton > : null }
{ user ?. uid === userId ? isEdit ? < DeleteButton onClick = { onEdit } > Edit Tweet </ DeleteButton > : null : null }
</ Column >
< Column >
{ photo === "" ? null : < Photo src = { photo } /> }
{ photo === "" ? null : isEdit ? < ImageEditButton > edit </ ImageEditButton > : null }
</ Column >
</ Wrapper >
)
현재 버튼들은 <DeleteButton>의 css를 그대로 가져오고 있다. 여기서 추가적으로 class만 추가해서 모양을 살짝 다르게 잡아준다.
return ( < Wrapper >
< Column >
< Username > { username } </ Username >
{ isEdit ? < TextArea required rows = { 2 } maxLength = { 180 } value = { changeTweet } onChange = { onChange } /> :
< Payload > { tweet } </ Payload > }
{ user ?. uid === userId ? < DeleteButton onClick = { onDelete } > Delete </ DeleteButton > : null }
{ user ?. uid === userId ? isEdit ? < DeleteButton className = "cancelBtn" onClick = { onEdit } > cancel </ DeleteButton > : < DeleteButton onClick = { onEdit } > Eidt </ DeleteButton > : null }
{ user ?. uid === userId ? isEdit ? < DeleteButton className = "editSubmitBtn" onClick = { onEdit } > Edit Tweet </ DeleteButton > : null : null }
</ Column >
< Column >
{ photo === "" ? null : < Photo src = { photo } /> }
{ photo === "" ? null : isEdit ? < DeleteButton className = "imageEditButton" > edit </ DeleteButton > : null }
</ Column >
</ Wrapper >
)
다르게 보일 버튼들에 className을 추가해 주고, 해당 css를 변경해 준다.
const DeleteButton = styled . button `
background-color : dodgerblue ;
color : white ;
font-weight : 600 ;
font-size : 12px ;
padding : 5px 10px ;
text-transform : uppercase ;
border-radius : 5px ;
cursor : pointer ;
& .cancelBtn {
background-color : inherit ;
color : dodgerblue ;
border-color : white ;
}
& .editSubmitBtn {
background-color : white ;
color : dodgerblue ;
float : right ;
}
& .imageEditButton {
margin-left : 20% ;
width : 35% ;
padding : 2px 7px ;
}
` ;
이제 남은 건 트윗 변경 버튼과, 이미지 변경 버튼에 적절하게 작동하는 함수를 붙이면 된다. 먼저 이미지부터 시작해 보자.
const onFileChange = ( e : React . ChangeEvent < HTMLInputElement >) => {
const { files } = e . target ;
if ( files && files . length === 1 ) {
if ( files [ 0 ]. size < 1 * 1024 * 1024 ){
setFile ( files [ 0 ]);
console . log ( "file on" );
} else {
alert ( "image file size should be less than 1Mb" );
}
}
}
기본 input창의 type을 file로 하면 스타일의 수정이 어렵기 때문에 숨겨주고, label을 추가하여 디자인을 변경시켜 준다.
const FileChangeButton = styled . label `
display : inline-block ;
margin : 3% 20% ;
text-align : center ;
width : 35% ;
padding : 2px 7px ;
border-radius : 5px ;
border : 1px solid white ;
text-transform : uppercase ;
font-size : 11px ;
cursor : pointer ;
` ;
const FileChangeInput = styled . input `
display : none ;
` ;
< Column >
{ viewPhoto === "" ? null : < Photo src = { viewPhoto } /> }
{ isEdit ? < FileChangeButton htmlFor = "FileChangeInput" > edit </ FileChangeButton > : null }
< FileChangeInput onChange = { onFileChange } type = "file" id = "FileChangeInput" accept = "image/*" />
</ Column >
const onFileChange = ( e : React . ChangeEvent < HTMLInputElement >) => {
const { files } = e . target ;
if ( ! files || files . length === 0 ) return ;
if ( files [ 0 ]. size > 1 * 1024 * 1024 ) {
alert ( "Image file size should be less than 1Mb" );
return ;
}
setFile ( files [ 0 ]);
};
useEffect (() => {
if ( ! file ) return ;
console . log ( "file useeffect" )
const reader = new FileReader ();
reader . readAsDataURL ( file );
reader . onload = () => {
const filelocation = reader . result as string ;
setViewPhoto ( filelocation );
};
}, [ file ]);
그리고 onFileChange 함수에 현재 등록한 파일을 FileReader()를 이용해 위치정보를 변환하고, 현재 이미지를 덮어 미리 보기 화 시켜주었다. 여기서 문제가 하나 발생했는데, 미리 보기가 내가 원하는 대상이 아니라 가장 위의 대상만을 변경시켰다.
실수는 너무 간단했지만... 찾는 데는 시간이 좀 걸렸다. 결국 원인을 여러 방면으로 역추적하다가 원본 input의 display:none을 해제한 후 file값을 넣을 때는 잘 작동하는 것을 보고 input과 label의 연결이 잘못된 걸 확인할 수 있었다.
결국 나의 실수는 label의 id값을 모두 통일시켜 버린 데에 있었다. 그렇기 때문에 가장 위에의 input만 추적대상이 되고 같은 모든 id를 쓰는 나머지 tweet들은 추적이 되지 않은 것이다. 그래서 추적이 바르게 되도록 label의 id값을 tweet의 id값으로 유동값으로 변경하였다.
{ viewPhoto === "" ? null : < Photo src = { viewPhoto } /> }
{ isEdit ? < FileChangeButton htmlFor = { id } > edit </ FileChangeButton > : null }
< FileChangeInput onChange = { onFileChange } type = "file" id = { id } accept = "image/*" />
이제 변경된 사항들을 가지고 수정요청만 하면 된다.
const onEditSubmit = async () => {
const ok = confirm ( "Are you sure you want to edit this tweet?" );
if ( ! ok || user ?. uid !== userId ) return ;
try {
setLoading ( true );
const docRef = doc ( db , "tweets" , id );
await updateDoc ( docRef , {
username : user . displayName ,
createAt : Date . now (),
tweet : changeTweet ,
userId : user . uid ,
}
);
// await setDoc(doc(db, `tweets/${id}`), {
// tweet: changeTweet,
// createdAt: Date.now(),
// username: user.displayName || "Anonymous",
// userId: user.uid,
// })
if ( file ) {
//S3 upload
const params = {
ACL : "public-read" ,
Body : file ,
Bucket : S3_BUKKET ,
ContentType : file . type ,
Key : "upload/" + file . name ,
};
const url = await myBuket . upload ( params , ( error : any ) => {
console . log ( error );
}). promise ();
await updateDoc ( docRef , {
photo : url . Location ,
photoKey : url . Key ,
});
}
} catch ( e ) {
console . log ( e );
} finally {
setLoading ( false );
setFile ( null );
setEdit ( false );
}
}
문서의 수정의 경우 updateDoc()과 setDoc() 두 가지로 가능하다. updateDoc()의 경우 변경할 추가 항목들만 작성하여 작성된 부분만 변경한다. setDoc()의 경우는 현재 자료로 모두 덮어버린다. image의 업데이트와 글수정이 비동기 처리되기 때문에 먼저 edit후에 수정할 이미지 file이 존재한다면 image 또한 update 해주었다.
tweets.tsx 전체 코드
import styled from "styled-components" ;
import { ITweet } from "./timeline" ;
import { auth , db } from "../firebase" ;
import { addDoc , collection , deleteDoc , doc , setDoc , updateDoc } from "firebase/firestore" ;
import AWS from "aws-sdk" ;
import { useEffect , useRef , useState } from "react" ;
const Wrapper = styled . div `
display : grid ;
grid-template-columns : 3fr 1fr ;
padding : 20px ;
border : 1px solid rgba ( 255 , 255 , 255 , 0.5 );
border-radius : 15px ;
` ;
const Column = styled . div `
& .photoBox {
margin-left : 10% ;
}
` ;
const Photo = styled . img `
width : 100px ;
height : 100px ;
border-radius : 15px ;
` ;
const Username = styled . span `
font-weight : 600 ;
font-size : 15px ;
` ;
const Payload = styled . p `
margin : 10px 0px ;
font-size : 18px ;
` ;
const DeleteButton = styled . button `
background-color : dodgerblue ;
color : white ;
font-weight : 600 ;
font-size : 12px ;
padding : 5px 10px ;
text-transform : uppercase ;
border-radius : 5px ;
cursor : pointer ;
& .cancelBtn {
background-color : inherit ;
color : dodgerblue ;
border-color : white ;
}
& .editSubmitBtn {
background-color : white ;
color : dodgerblue ;
float : right ;
}
` ;
const FileChangeButton = styled . label `
display : inline-block ;
margin : 3% 20% ;
text-align : center ;
width : 35% ;
padding : 2px 7px ;
border-radius : 5px ;
border : 1px solid white ;
text-transform : uppercase ;
font-size : 11px ;
cursor : pointer ;
` ;
const FileChangeInput = styled . input `
display : none ;
` ;
const TextArea = styled . textarea `
border : 2px solid white ;
padding : 20px ;
border-radius : 20px ;
font-size : 16px ;
color : white ;
background-color : black ;
width : 100% ;
resize : none ;
font-family : system-ui , -apple-system, BlinkMacSystemFont, 'Segoe UI' , Roboto, Oxygen, Ubuntu, Cantarell, 'Open Sans' , 'Helvetica Neue' , sans-serif ;
& ::placeholder {
font-size : 16px ;
}
& :focus {
outline : none ;
border-color : #1d9bf0 ;
}
` ;
export default function Tweet ({ username , photo , tweet , userId , id , photoKey } : ITweet ) {
//S3 setting--------------------------------------
const ACCESS_KEY = import . meta . env . VITE_ACCESS_KEY
const SECRET_KEY = import . meta . env . VITE_SECRET_KEY
const REGION = "ap-northeast-2" ;
const S3_BUKKET = "sulgibucket" ;
AWS . config . update ({
accessKeyId : ACCESS_KEY ,
secretAccessKey : SECRET_KEY ,
});
const myBuket = new AWS . S3 ({
params : { Buket : S3_BUKKET },
region : REGION ,
});
//------------------------------------------------
const [ isLoading , setLoading ] = useState ( false );
const [ isEdit , setEdit ] = useState ( false );
const [ changeTweet , setChangeTweet ] = useState ( tweet );
const [ viewPhoto , setViewPhoto ] = useState ( photo );
const [ file , setFile ] = useState < File | null >( null );
const user = auth . currentUser ;
const onDelete = async () => {
const ok = confirm ( "Are you sure you want to delete this tweet?" );
if ( ! ok || user ?. uid !== userId ) return ;
try {
await deleteDoc ( doc ( db , "tweets" , id ));
if ( photo !== "" ) {
if ( ! photoKey ) return ;
const params = {
Bucket : S3_BUKKET ,
Key : photoKey ,
};
myBuket . deleteObject ( params , ( error : any ) => { console . log ( error )});
}
} catch ( e ) {
console . log ( e );
} finally {
}
}
const onChange = ( e : React . ChangeEvent < HTMLTextAreaElement >) => {
setChangeTweet ( e . target . value );
}
const onEditSubmit = async () => {
const ok = confirm ( "Are you sure you want to edit this tweet?" );
if ( ! ok || user ?. uid !== userId ) return ;
try {
setLoading ( true );
const docRef = doc ( db , "tweets" , id );
await updateDoc ( docRef , {
username : user . displayName ,
createAt : Date . now (),
tweet : changeTweet ,
userId : user . uid ,
}
);
// await setDoc(doc(db, `tweets/${id}`), {
// tweet: changeTweet,
// createdAt: Date.now(),
// username: user.displayName || "Anonymous",
// userId: user.uid,
// })
if ( file ) {
//S3 upload
const params = {
ACL : "public-read" ,
Body : file ,
Bucket : S3_BUKKET ,
ContentType : file . type ,
Key : "upload/" + file . name ,
};
const url = await myBuket . upload ( params , ( error : any ) => {
console . log ( error );
}). promise ();
await updateDoc ( docRef , {
photo : url . Location ,
photoKey : url . Key ,
});
}
} catch ( e ) {
console . log ( e );
} finally {
setLoading ( false );
setFile ( null );
setEdit ( false );
}
}
const onEdit = () => {
if ( user ?. uid !== userId ) return ;
setEdit ( ! isEdit );
setChangeTweet ( tweet );
setFile ( null );
}
const onFileChange = ( e : React . ChangeEvent < HTMLInputElement >) => {
const { files } = e . target ;
if ( ! files || files . length === 0 ) return ;
if ( files [ 0 ]. size > 1 * 1024 * 1024 ) {
alert ( "Image file size should be less than 1Mb" );
return ;
}
setFile ( files [ 0 ]);
};
useEffect (() => {
if ( ! file ) return ;
console . log ( "file useeffect" )
const reader = new FileReader ();
reader . readAsDataURL ( file );
reader . onload = () => {
const filelocation = reader . result as string ;
setViewPhoto ( filelocation );
};
}, [ file ]);
return ( < Wrapper >
< Column >
< Username > { username } </ Username >
{ isEdit ? < TextArea required rows = { 2 } maxLength = { 180 } value = { changeTweet } onChange = { onChange } /> :
< Payload > { tweet } </ Payload > }
{ user ?. uid === userId ? < DeleteButton onClick = { onDelete } > Delete </ DeleteButton > : null }
{ user ?. uid === userId ? isEdit ? < DeleteButton className = "cancelBtn" onClick = { onEdit } > cancel </ DeleteButton > : < DeleteButton onClick = { onEdit } > Eidt </ DeleteButton > : null }
{ user ?. uid === userId ? isEdit ? < DeleteButton className = "editSubmitBtn" onClick = { onEditSubmit } > Edit Tweet </ DeleteButton > : null : null }
</ Column >
< Column className = "photoBox" >
{ viewPhoto === "" ? null : < Photo src = { viewPhoto } /> }
{ isEdit ? < FileChangeButton htmlFor = { id } > edit </ FileChangeButton > : null }
< FileChangeInput onChange = { onFileChange } type = "file" id = { id } accept = "image/*" />
</ Column >
</ Wrapper >
)
}
이전 글 :
[노마드 코더] ReactJS 트위터 클론 코딩 - Router [노마드 코더] ReactJS 트위터 클론 코딩 - Authentication [노마드 코더] ReactJS 트위터 클론 코딩 - Github Login [노마드 코더] ReactJS 트위터 클론 코딩 - Tweeting
[노마드 코더] ReactJS 트위터 클론 코딩 - Uploading Images with S3 [노마드 코더] ReactJS 트위터 클론 코딩 - Fetching Timeline
[노마드 코더] ReactJS 트위터 클론 코딩 - Realtime Tweets & Delete
다음 글 :
[노마드 코더] ReactJS 트위터 클론 코딩 - Pfofile page